Let's Explore this - File Explorer!!

I was practicing for React coding rounds and encountered an interesting problem: building a File Explorer.
In this blog, we'll build it step by step, just like in an interview. Expect some refactoring along the way—it's part of the process! Optimization will happen naturally.
Before coding, I listed all the features and the sequence to follow. Here's the plan:
// TODO
// 1. Create a data structure with some dummy data
// 2. Display all file and folder names from the data
// 3. Build a UI that looks like a file explorer (tree structure)
//    - Add options to Add, Delete, and Rename
// 4. Implement open/close (expand/collapse) functionality for folders
// 5. Implement "Add File" and "Add Folder" functionality
//    - Handle input and placement correctly
// 6. Implement "Delete File" and "Delete Folder" functionality
// 7. Implement "Rename File" and "Rename Folder" functionality
Step 1 – Create a Vite Project
Why Vite? It’s faster than Create React App, so I prefer using it now.
Run the command below:
npm create vite@latest
It will ask for a project name and framework — choose React (JavaScript or TypeScript).
Step 2 – How to Design the Data
Before jumping in, always ask: Will the data come from an API, or do I need to design it myself?
In this case, there’s a high chance you’ll have to create it on your own.
So how do you decide what type of data to use, what keys to include, and how to structure it?
Here’s what helped me — I simply looked at the folder structure of my own project for reference.
So first, create a data.json file in your project root and just look at your folders.
What do you see?
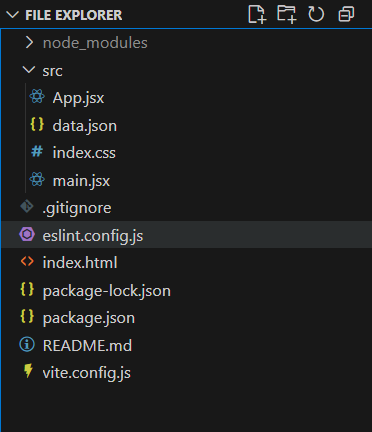
now, what do you see?
Some files
Some folders
Each has a unique name
Folders can contain files/folders — a clear parent–child relationship
Using these observations, we'll create our JSON data structure.
Here's a small example for you to see:
[
  {
    "name": "node_modules",
    "isFolder": true,
    "id": 1,
    "children": [
      {
        "name": "react",
        "isFolder": true,
        "id": 2,
        "children": []
      },
      {
        "name": "react-dom",
        "id": 3,
        "isFolder": false
      }
    ]
  },
  {
    "name": "src",
    "isFolder": true,
    "id": 4,
    "children": [
      {
        "name": "App.jsx",
        "id": 5,
        "isFolder": false
      },
      {
        "name": "data.json",
        "id": 6,
        "isFolder": false
      },
      {
        "name": "components",
        "id": 7,
        "isFolder": true,
        "children": []
      },
    ]
  },
  {
    "name": "index.html",
    "id": 10,
    "isFolder": false
  },
  {
    "name": "pacakage.json",
    "id": 11,
    "isFolder": false
  }
]
Now that our first and very important step is complete, let's move on to the UI.
Step 3 - Display all file and folder names from the data
we will do it two phase
first we will only render the main parents
second we will see what to do with child
import data from "./data.json";

function App() {
  return (
    <>
      File explorer
      {/* printing just the parent  */}
      {data?.map((ele) => (
        <>
          <p>{ele?.name}</p>
        </>
      ))}
    </>
  );
}

export default App;
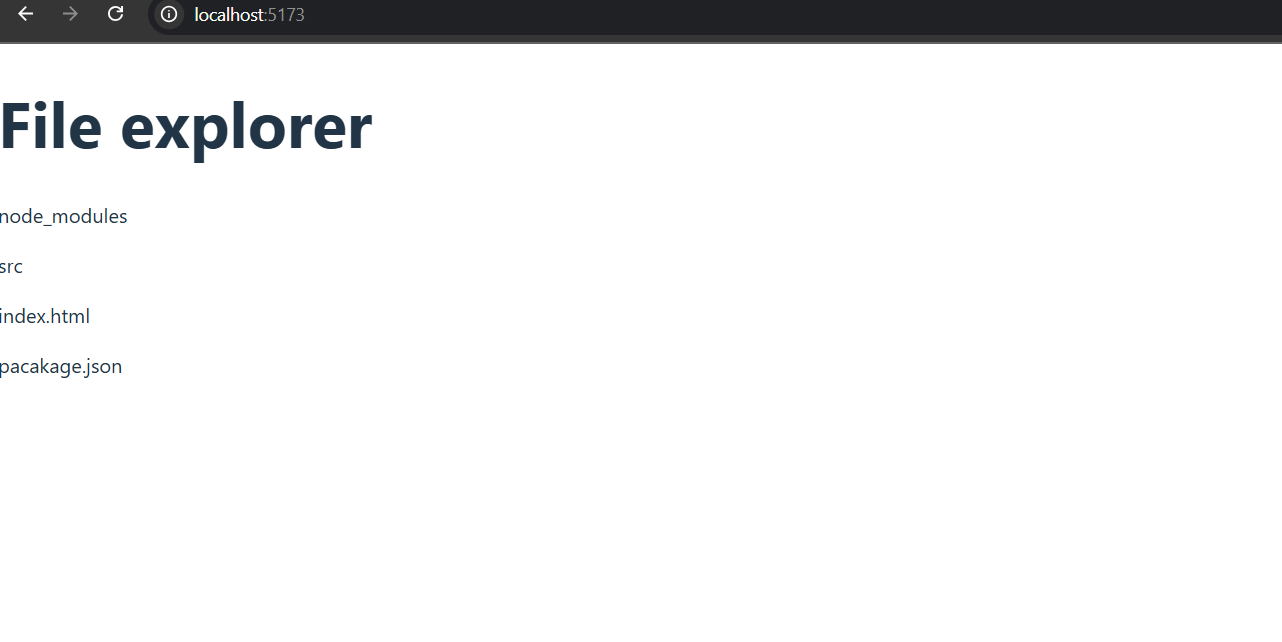
Now for the second phase — printing the children.
The challenge is the unknown levels of nesting, which can be infinite.
This is where DSA helps, especially Recursion.
How recursion works here
Process each object (file or folder).
If it’s a file, print it.
If it’s a folder, print its name and call the function again for its children.
Repeat until there are no children left.
Recursion allows one function to handle all nesting levels automatically.
import { useState } from "react";
import File from "./components/File";
import data from "./data.json";

function App() {
  // State to manage the folder structure data
  const [folderData, setFolderData] = useState(data);

  return (
    <div style={{ width: "max-content" }}>
      <h1>File Explorer</h1>

      {/*
        Loop through the root-level folder data and render File components
        for each item (file or folder)
      */}
      {folderData?.map((ele) => (
        <File
          key={ele.name}
          data={ele}
          folderData={folderData}
          setFolderData={setFolderData}
        />
      ))}
    </div>
  );
}

export default App;
File Component
The File component represents a single file or folder in our explorer.
const File = ({ data, folderData, setFolderData }) => {
  return (
    <div>
      {/*
        Main container for the file/folder item
        Uses flexbox to align content properly
      */}
      <div style={{ display: "flex", justifyContent: "space-between" }}>
        <div
          style={{
            display: "flex",
            alignItems: "center",
            // Cursor changes to pointer for folders to show interactivity
            cursor: data?.isFolder ? "pointer" : "default",
            gap: "6px",
          }}
        >
          {/* Display the name of the file or folder */}
          <span>{data?.name}</span>
        </div>
      </div>

      {/*
        Indented container for children elements (sub-folders or files)
        This creates the nested tree structure visually
      */}
      <div style={{ paddingLeft: "20px" }}>
        {/*
          Recursively render File components for each child item
          This enables the nested folder structure
        */}
        {data?.children?.map((ch) => (
          <File
            key={ch.name}
            data={ch}
            folderData={folderData}
            setFolderData={setFolderData}
          />
        ))}
      </div>
    </div>
  );
};

export default File;
What’s happening here
Renders the current file or folder name.
Checks: “Do I have children?”
If NO children → stop recursion.
If HAS children → recursive call:
Loops through each child.
Creates a new
Filecomponent for each one.Passes the child data down.
Adds indentation for visual hierarchy.
That’s it — recursion in action, and our file explorer now handles infinite nesting automatically.
Step 3 - Build a UI like a file explorer
Give every file/folder options to Add, Delete, and Rename
Use basic CSS styling — nothing logic-heavy yet
const File = ({ data, folderData, setFolderData }) => {
  return (
    <div>
      {/*
        Main row for each file/folder.
        We use flexbox to separate the left (name) and right (actions).
      */}
      <div style={{ display: "flex", justifyContent: "space-between" }}>
        {/*
          LEFT SIDE → Folder/File name with toggle area.
          If it’s a folder, we show pointer cursor (indicating it can be expanded later).
        */}
        <div
          style={{
            display: "flex",
            alignItems: "center",
            cursor: data?.isFolder ? "pointer" : "default",
            gap: "6px",
          }}
        >
          {/* Display file/folder name */}
          <span>{data?.name}</span>
        </div>

        {/*
          RIGHT SIDE → Action icons.
          - All items (file/folder) have Delete and Rename options.
          - Only folders have Add File and Add Folder options.
        */}
        <div style={{ display: "flex", gap: "5px" }}>
          {data?.isFolder && (
            <>
              {/* Add File option (only for folders) */}
              <p style={{ margin: 0, cursor: "pointer" }} title="Add file">
                🗃️
              </p>

              {/* Add Folder option (only for folders) */}
              <p style={{ margin: 0, cursor: "pointer" }} title="Add folder">
                📁
              </p>
            </>
          )}

          {/* Delete option (for both files and folders) */}
          <p style={{ margin: 0, cursor: "pointer" }} title="Delete">
            🗑️
          </p>

          {/* Rename option (for both files and folders) */}
          <p style={{ margin: 0, cursor: "pointer" }} title="Rename">
            🖊️
          </p>
        </div>
      </div>

      {/*
        CHILDREN SECTION
        - Add indentation to show folder hierarchy visually.
        - Recursively render File components for all children.
      */}
      <div style={{ paddingLeft: "20px" }}>
        {data?.children?.map((ch) => (
          <File
            key={ch.name}
            data={ch}
            folderData={folderData}
            setFolderData={setFolderData}
          />
        ))}
      </div>
    </div>
  );
};

export default File;
Here i have added icons depending upon file or folder -
Each file/folder can now be renamed or deleted.
Only folders have the option to add new files or folders inside them.
Step 4 - Implement open/close (expand/collapse) functionality for folders
Here, if the current data is of folder type, we’ll toggle between expanded and collapsed states on click.
We’ll render its children only when it’s expanded.
import { useState } from "react";

const File = ({ data, folderData, setFolderData }) => {
  // Local state to manage expand/collapse for this folder
  const [isExpanded, setIsExpanded] = useState(true);

  return (
    <div>
      {/* Main row for file/folder */}
      <div style={{ display: "flex", justifyContent: "space-between" }}>

        {/* Left side: Folder/File name + expand toggle */}
        <div
          style={{
            display: "flex",
            alignItems: "center",
            cursor: data?.isFolder ? "pointer" : "default",
            gap: "6px",
          }}
          onClick={() => {
            // If it's a folder, toggle expand/collapse
            if (data?.isFolder) setIsExpanded((prev) => !prev);
          }}
        >
          {/* Arrow for expand/collapse (visible only for folders) */}
          {data?.isFolder && (
            <span>{isExpanded ? "▼" : "▶"}</span>
          )}

          {/* File or folder name */}
          <span>{data?.name}</span>
        </div>

        {/* rest code remains same*/}

      </div>

      {/* Recursive rendering of children - only when expanded */}
      {isExpanded && (
        <div style={{ paddingLeft: "20px" }}>
          {data?.children?.map((ch) => (
            <File
              key={ch.name}
              data={ch}
              folderData={folderData}
              setFolderData={setFolderData}
            />
          ))}
        </div>
      )}
    </div>
  );
};

export default File;
The logic-
isExpanded→ A state that keeps track of whether a folder is open or closed.When you click on a folder name, it toggles between true/false.
Children are rendered only if
isExpandedis true (that’s our condition).The arrow symbol (
▶or▼) visually indicates whether the folder is expanded or collapsed.
Now comes the big guns ADDING and DELETEING!!
Step 5 - Implement "Add File" and "Add Folder" functionality
Here, we'll explore each step in detail:
Step 1: Add
isAddingandisFilestates, and connect them to icons.Step 2: Add
newFileFolderNameand show<input>whenisAddingis true.Step 3: Use Enter/Escape/Blur to confirm or cancel input.
Step 4: Create
handleAddingFileFolderto update the tree, and call it on Enter/Blur.
Track what we are adding (file or folder):
Action: AddisAdding(to show input) andisFile(true for file, false for folder) states. Connect these states to the add icons.import { useState } from "react"; const File = ({ data, folderData, setFolderData }) => { const [isAdding, setIsAdding] = useState(false); // show/hide input const [isFile, setIsFile] = useState(null); // true => file, false => folder return ( <div> <div style={{ display: "flex", justifyContent: "space-between" }}> <div style={{ display: "flex", alignItems: "center", gap: "6px" }}> <span>{data?.name}</span> </div> <div style={{ display: "flex", gap: "5px" }}> {data?.isFolder && ( <> <p style={{ margin: 0, cursor: "pointer" }} title="Add file" onClick={() => { setIsAdding(true); setIsFile(true); }} > 🗃️ </p> <p style={{ margin: 0, cursor: "pointer" }} title="Add folder" onClick={() => { setIsAdding(true); setIsFile(false); }} > 📁 </p> </> )} <p style={{ margin: 0, cursor: "pointer" }} title="Delete">🗑️</p> <p style={{ margin: 0, cursor: "pointer" }} title="Rename">🖊️</p> </div> </div> {/* children recursion placeholder */} <div style={{ paddingLeft: "20px" }}> {data?.children?.map((ch) => ( <File key={ch.name} data={ch} folderData={folderData} setFolderData={setFolderData} /> ))} </div> </div> ); }; export default File;Render the input when adding (positioned under the folder where user clicked)
What to do: add
newFileFolderNamestate and render an<input>whenisAddingis true. No add logic yet — just UI.import { useState } from "react"; const File = ({ data, folderData, setFolderData }) => { const [isAdding, setIsAdding] = useState(false); const [isFile, setIsFile] = useState(null); const [newFileFolderName, setNewFileFolderName] = useState(""); return ( <div> <div style={{ display: "flex", justifyContent: "space-between" }}> <div style={{ display: "flex", alignItems: "center", gap: "6px" }}> <span>{data?.name}</span> </div> <div style={{ display: "flex", gap: "5px" }}> {data?.isFolder && ( <> <p style={{ margin: 0, cursor: "pointer" }} title="Add file" onClick={() => { setIsAdding(true); setIsFile(true); }}>🗃️</p> <p style={{ margin: 0, cursor: "pointer" }} title="Add folder" onClick={() => { setIsAdding(true); setIsFile(false); }}>📁</p> </> )} <p style={{ margin: 0, cursor: "pointer" }} title="Delete">🗑️</p> <p style={{ margin: 0, cursor: "pointer" }} title="Rename">🖊️</p> </div> </div> {/* add input (UI only) */} {isAdding && ( <input autoFocus value={newFileFolderName} onChange={(e) => setNewFileFolderName(e.target.value)} style={{ marginLeft: "20px" }} /> )} <div style={{ paddingLeft: "20px" }}> {data?.children?.map((ch) => ( <File key={ch.name} data={ch} folderData={folderData} setFolderData={setFolderData} /> ))} </div> </div> ); }; export default File;Wire input behavior: Enter (confirm), Escape (cancel), Blur (confirm)
What to do: add
onKeyDownandonBlurto the input. For now these will toggle UI; the real insertion function will be added next. Make sure Enter prevents default.const cancelAdd = () => { setIsAdding(false); setNewFileFolderName(""); }; // in ui {isAdding && ( <input autoFocus value={newFileFolderName} onChange={(e) => setNewFileFolderName(e.target.value)} onKeyDown={(e) => { if (e.key === "Enter") { e.preventDefault(); // placeholder: actual add function will be called here in next step setIsAdding(false); setNewFileFolderName(""); } if (e.key === "Escape") cancelAdd(); }} onBlur={() => { // placeholder: call add function here later if (newFileFolderName.trim()) { setIsAdding(false); setNewFileFolderName(""); } else cancelAdd(); }} style={{ marginLeft: "20px" }} /> )}Main logic: build
handleAddingFileFolderand insert immutablynow we will write a function that, given the clicked node
nameandisFolder, returns updated tree with new node appended to that node’schildren. We do this immutably and recursively.4.a) Helper idea
Create a recursive
updateItems(list)that returns a new list where the item with matchingnamehas the new child appended.If a node has
children, callupdateItemson them.
4.b) Implement the function and call setFolderData(prev => updateItems(prev)).
4.c) Wire it to Enter/Blur: call handleAddingFileFolder(data.name, !isFile).
      // main insertion logic (recursive, immutable)
      const handleAddingFileFolder = (id, isFolder) => {
        if (!newFileFolderName.trim()) return;

        const updateItems = (list) => {
          return list?.map((a) => {
            // match by id instead of name
            if (a.id === id) {
              const newItem = {
                id: Date.now(),
                name: newFileFolderName,
                isFolder,
                children: isFolder ? [] : undefined,
              };
              return { ...a, children: [...(a.children || []), newItem] };
            }

            // recurse through children if any
            if (a?.children) {
              return { ...a, children: updateItems(a.children) };
            }

            return a;
          });
        };

        setFolderData((prev) => updateItems(prev));
        setIsAdding(false);
        setNewFileFolderName("");
      };
How it finds the right spot:
It goes through every folder
When it finds a folder with matching id→ adds the new item there
If folder has sub-folders → searches inside them too
Returns everything else unchanged
Wow, that was intense! Trust me, things are much easier now!
Step 5 - Implement "Delete File" and "Delete Folder" functionality
It's pretty simple and similar to adding functionality. We will focus on the main delete function here.
const handleDelete = (idToDelete) => {
  // Recursive function that searches through the entire tree
  const deleteItems = (list) => {
    // Step 1: Remove the item with matching ID from current level
    return list
      ?.filter((item) => item.id !== idToDelete)
      // Step 2: For all remaining items, check if they have children
      ?.map((item) => {
        // Step 3: If this item has children, we need to search inside them too
        if (item?.children) {
          return {
            ...item, // Keep all original properties of the item
            children: deleteItems(item.children) // Recursively search in children
          };
        }
        // Step 4: If no children, return the item as-is
        return item;
      });
  };

  // Update the global state with the new filtered tree
  setFolderData((prev) => deleteItems(prev));
};
- Start searching
- Check each file/folder at the current level.
- Remove matching item
Remove the item if its ID matches the one to delete.
Keep the item if the ID doesn't match.
- Check for sub-folders
For remaining items with children, repeat the search process inside them.
If no children, leave the item as-is.
- Update everything
Save the new version without the deleted item.
Keep all other files/folders in place.
Now only one thing is left!!
Step 6 - Implement "Rename File" and "Rename Folder" functionality
- Add States + UI for Rename
What’s happening here
isRenaming: boolean → tells if we are currently renaming a file/folderrenameValue: stores the current rename input value (starts as the old name)
When user clicks ✏️ (rename icon):
We set
isRenaming(true)Show an input box in place of the file/folder name
Let user type new name
import { useState } from "react";

const File = ({ data, folderData, setFolderData }) => {
  const [isExpanded, setIsExpanded] = useState(true);

  // rename related states
  const [isRenaming, setIsRenaming] = useState(false); // tells if rename mode is active
  const [renameValue, setRenameValue] = useState(data.name); // stores current name or new input

  return (
    <div>
      {/* File/Folder Row */}
      <div style={{ display: "flex", justifyContent: "space-between" }}>
        {/* LEFT SIDE — File/Folder name */}
        <div
          style={{ display: "flex", alignItems: "center", gap: "6px", cursor: data?.isFolder ? "pointer" : "default" }}
          onClick={() => {
            if (data?.isFolder) setIsExpanded((prev) => !prev);
          }}
        >
          {data?.isFolder && <span>{isExpanded ? "▼" : "▶"}</span>}

          {/*  If rename mode is ON, show input else show normal name */}
          {isRenaming ? (
            <input
              autoFocus
              value={renameValue}
              onChange={(e) => setRenameValue(e.target.value)}
              onKeyDown={(e) => {
                if (e.key === "Enter") {
                  // later we’ll handle rename function here
                }
                if (e.key === "Escape") setIsRenaming(false);
              }}
              onBlur={() => setIsRenaming(false)}
            />
          ) : (
            <span>{data?.name}</span>
          )}
        </div>

        {/* RIGHT SIDE — buttons like rename, delete etc */}
        <div style={{ display: "flex", gap: "5px" }}>
          <p
            style={{ margin: 0, cursor: "pointer" }}
            title="Rename"
            onClick={() => {
              setRenameValue(data.name); // set current name
              setIsRenaming(true); // enter rename mode
            }}
          >
            🖊️
          </p>
        </div>
      </div>
    </div>
  );
};

export default File;
- Add Rename Logic Function
  // Step 2: Rename function
  const handleRename = (oldName, newName) => {
    if (!newName.trim()) return; // avoid empty names

    // Recursive function to update names in nested structure
    const updateItems = (list) => {
      return list?.map((a) => {
        if (a.name === oldName) {
          // if the name matches, update it
          return { ...a, name: newName };
        }
        if (a.children) {
          // if it has children, recursively update inside
          return { ...a, children: updateItems(a.children) };
        }
        return a;
      });
    };

    // set updated folder data
    setFolderData((prev) => updateItems(prev));
    setIsRenaming(false); // close rename mode
  };
- Start searching
Check the list of files/folders at the current level.
Examine each item.
- Find matching item
If an item's name matches the old name, update it.
If not, leave it unchanged.
- Check for sub-folders
For each item with children:
Repeat the search process inside.
Rename if found.
If no children, leave the item as-is.
- Update everything
Save the new version with the renamed item.
Keep all other files/folders in place.
We can add new features too - so go ahead pin me what more we can do!
Here is repo of my github link - https://github.com/vaishdwivedi1?tab=repositories
Deployed link - https://elegant-frangipane-07b2f1.netlify.app/
Do share your views!!


